How to Do Your Own Yearly Home Inspection
Posted by Steve Harmer on Sunday, December 6th, 2015 at 10:53am.
How to Do Your Own Yearly Home Inspection
 Before you buy a home, it’s always a good idea to get a professional home inspector—but that shouldn’t be the only time you give your home a thorough look. Here’s a checklist of what to look for when performing a yearly visual inspection on your own home, or one you are considering buying.
A professional home inspection should not be skipped when buying a property. But when you first visit the house, you can also do your own visual inspection so you can watch for certain trouble spots. Even after you buy the house, doing this at least once a year will catch most issues before they become major problems.
You’ll need a pair of binoculars, flashlight, gloves, screwdriver, notepad and pen, and a camera to document problems.
Outside the House
 Begin your inspection on the outside of the home, where most problems will be found. Use your binoculars to scan the roof line, high walls, and chimney. Unless you suspect major damage, save climbing on the roof for the pros.
Do a slow walk around the home and take it all in. Does everything look level? Roof lines should look solid and not tilted or leaning. Windows should be square and not show rot in the wood around them. In addition, look at:
- Gutters and Downspouts: Check for cracks, clogs, and damaged elbows. These problem areas allow water to run along walls and into the foundation, which can cause major damage. Use a ladder to investigate twigs or grass you see growing from the gutter.
- Paint: Check for peeling paint, which can be a sign of moisture penetration on the wall. Cracking and flaking paint is due to adhesion problems or the surface deterioration. These are indicators that the siding needs to be replaced or repaired.
- Chimneys: Look for anything that might be blocking the chimney opening such as a birds nest or fallen leaves. Inspect the bricks and mortar around the chimney which should be intact, with no cracks or broken pieces that allow water to seep in.
- Roof: Check for broken or missing shingles, which compromises the weather protection of your home. Large tree branches that rest against or over your roof, can allow unwanted pests and rodents to gain access to your home. Tree branches that break off in storms can also cause damage.
- Foundation: Take note of the grade around the foundation. It should be at least 8 inches below the siding (to prevent insects from getting into the siding) and slope away from the house. Keep an eye on hairline cracks in the foundation and take photos to document their size. A pro should inspect larger cracks in the concrete.
- Driveways and Garage: Loose and cracking asphalt is a tripping hazard and also an entry point for water which can cause damage in the colder months.
- Windows: Look for weather rotted caulk that is peeling or flaking away. These areas are prime for water and cold air to enter your home.
- Decks, Stairs, and Porches: These areas require regular maintenance and it’s important to inspect above and below the surface. Look for loose and broken boards and missing screws. Inspect for signs of termite damage which include tunnels in wood or winged insects.
- Dryer vent: Make sure the dryer outlet is clear.
Preventing water from entering your home is the number one concern during a home inspection. Water and moisture inside your walls, floors, and basement is expensive to find and fix. By doing some preventative work, you have a great chance to catch an issue early on.

Inside the House
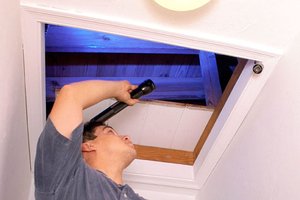 Use a flashlight when inspecting the inside of a home. It will allow you to spot problems under the sink, behind dressers, and in the basement and attic.
- Walls and Ceilings: Dark blotchy stains can mean mildew from poor ventilation. Brown rings indicate a water leak from a broken pipe or problem with the roof.
- Kitchen Backsplash and Counter: Look for open space between the backsplash and counter near the sink. This could allow water to drip behind the cabinets or sink.
- Tub Surround: Damaged grout and cracked tiles are entry points for water getting into the walls. Feel for loose tiles around a tub or sink, as this may indicate an ongoing issue.
- Caulk in the Bathroom: Check the condition of caulk around the bathtub, shower, and sink. If its deteriorating, water can get into the subfloor or walls.
- Service Panel: Signs of rust inside a service panel indicates water is leaking into the panel. This can cause electrical shorts and be very hazardous. Scorch marks are an indicator that there is definitely a problem. Messy splices and uncovered Call an electrician immediately.
- Stairs and Railings: Interior staircases and railings should feel solid under your feet and in your hands. Look underneath staircases for wood rot and damage. Older homes may have railing widths that are too wide which can be a hazard for small children.
- Interior Paint: Wall surfaces should be clean and smooth. Vertical cracks in the paint can indicate drywall separation. Homes built before 1978 may also have lead paint, which requires special care during renovations.
- Attic: Check for stains in the roof structure which are signs of a water leak. The entire floor surface of the attic should be insulated, including the corners and around vents.
- Subfloor: Poke up at the subfloor from the basement with a screwdriver. It should be hard and solid. If it’s soft or squishy the wood could be rotted. If it’s rotted, try to determine if it’s anything other than age.
- Basement: Basements should smell clean, without a hint of mold or mildew. Rust on objects that touch the floor would indicate previous flooding or moisture seepage into the floor.
- Water Pipes: All plumbing should be corrosion free. Rust and discoloration are signs of a water leak.
- Appliances: If appliances are included with a home, check on their working condition. Check the coils on the refrigerator.
- Safety Alarms: Smoke and carbon monoxide detectors should be in every sleeping room and common area.
Check the Systems
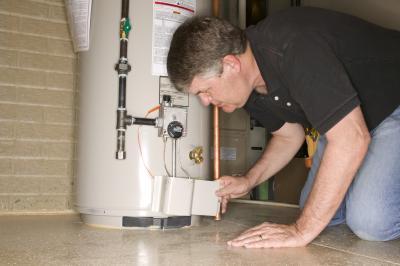 Turn on the hot and cold water at every sink and look under the sink for leaks when the water is running. Check the water lines around toilets, washers, and hot water heaters for leaks.
Turn on the heating and cooling system and let it run a few minutes. Listen for irregular sounds and check boilers, water heaters, and AC units for loose pipes. You’ll need to venture outside or in the basement to do this properly.
The purpose of a whole house inspection is to locate trouble spots, but to also know your house inside and out. This is the best way to determine what’s normal and what might be an issue down the road.
A professional home inspection should not be skipped when buying a property.
© http://workshop.lifehacker.com/how-to-do-your-own-yearly-home-inspection-1728175860